Páginas

May 24, 2013

Electric Bass from wood scraps - Contra-baixo eletrico de sucata de madeira


Hello once again!
Olá mais uma vez!

We are preparing here to post the results from the Metropolia University's student groups, meanwhile I will publish this project which I accomplished by the beginning of the year. It is a 4 strings neck through bass guitar made from scraps of woods collected in wood workshops in Helsinki - Finland. It is a bit more "professional" project then the "easy to make" products we aim to post here, but I we had many people asking to see more about the building process of it. Here it goes. I won't describe each stage in details, because it is a very long process, but if you have any question, I will be happy to answer. 
Estamos preparando o post dos resultados dos alunos da Metropolia, mas enquanto isso vamos publicar esse projecto que eu completei no início do ano. É um contra-baixo eletrico inteiriço, fretless (sem trastes) feito com sucatas de madeira coletadas pelas marcenarias de Helsinki - Finlândia. É um projeto mais "proffisional" do que os "faceis de fazer em casa" que gostamos de publicar, mas como muita gente se pediu pra ver o processo de construção deste instrumento, aqui vai. Eu não vou detalhar cada etapa muito bem por ser um processo longo, mas se tiverem alguma questão, eu ficarei feliz em responder.


But first, some background info about the motivations I had to build this project (which will have continuations soon):  
Mas antes um pouco de informação sobre o porque que eu resolvi fazer esse projeto (que terá continuações em breve):

From the 50's until today the technological - and especially digital technologies - evolution was enormous (see the evolution of televisions, computers, mobile phones and so on, all the electronics in this period). However the electronic layout of guitars (standard passive settings) had no - or almost none - change or evolution. The construction of electric instruments still rely on the use of rare and mostly endangered species of wood. By seeing this gap between technological evolution and the "frozen in time" technology of electric systems of guitars I decided to build an instrument based on the most unwanted woods - the scraps; and then, use "high tech" technology to show that even with alternative materials, if we use the proper technology, we can have great sounding musical instruments with a more balanced environmental impact. For that I used (old) humbucker pickups and a 5.4 Bartolini internal pre-amp. The result was better than I expected. The aim was not to not use wood, since wood can be one of the more sustainable materials if used consciously (with sustainable forest management and etc.). Therefore the aim of to build a wood instrument based on the conscious use of resources - right woods, right pieces and technologies.

Dos anos 50 até hoje, a evolução tecnológica - e especialmente as digitais - foram enormes (veja, por exempleo, a evolução de televisores, computadores, celulares entre outros neste periodo). No entando, a parte eletrica de intrumentos musicais (comunmente passivos) mudou muito pouco ou quae nada. A construção destes instrumentos ainda se baseia muito no uso de madeiras raras muitas vezes ameaçadas de extinção. Por ver essa diferença entre a evolução tecnológia e a tecnologia parada no tempo usada nos instrumentos elétricos eu resolvi montar um istrumento com as madeiras menos desejadas - as sucatas. E ent~áo usar tecnologia "de ponta" para provar que mesmo com materiais alternativos, se ultilizamos a tecnologia adequada, podemos ter instrumentos com ótima sonoridade e menor impacto ambiental. Para isso eu usei uns humbuckes antigos (que eu tinha em casa) e um pre-amp Bartolini 5.4. O resultado foi melhor do que eu esperava! A intenção não foi de usar menos madeira ou de retirar o uso da madeira, visto que tal material pode ser um dos mais sustentáveis se usado conscientemente (com manejo florestal apropriado). Assim, o foco foi de contruir um instrumento utilizando-se conscientemente das recursos disponíveis - madeiras certas, peças e tecnologia apropriada.


Here is the process, hope you like it! 
Aqui está o processo, espero que gostem!


Preparing the "neck through" (core) piece from big pieces of wood.
Preparando a parte inteiriça "corpo - braço" com pedaços grandes de madeira


First leveling of the "core" and the assembly of the sides with many different pieces of wood.
Primeiro nivelamento to centro e montagem das laterais do corpo com diversos pedaços de madeira


Cutting everything near the final shape. Here I had to use a new rosewood piece for the fretboard
Cortando tudo próximo ao formato final. Aqui eu tive que usar uma peça de Pau ferro para a escala


Marking the headstock
Desenhando a mão do instrumento 


shaping the neck
Shape do braço


now on the headstock, sanding, drilling and small details
Agora na mão, lixamento, furação e alguns detalhes


headstock - neck shape
formato da parte mão - braço


Planning the body - core connection shape
Planejando a area de conexão do corpo com o braço


Marquetry for the headstock (with some help of laser cutting for the logo) 
Marchetaria para a "mão" (com um pouco de ajuda de corte a laser para o logo)


Applied marquetry
Marchetaria pronta


 The ready neck with fret marks, dots and radius
 O braço pronto, com marca das casas, marcaçoes e raio


Making the electronics cavities
Fazendo as cavidades para as partes elétricas


Finally gluing the core and the body "wings" together
Finalmente colando o centro e as "asas" do corpo juntas


Making the pickups cavities
Fazendo as cavidades dos captadores


 Almost there!
 Quase lá!


Shaping the body
Acertando o corpo


More carving
Mais shape no corpo


Finishing the back part
Terminando a parte traseira


Final sanding
Lixamento final


Truss rod cover, last peace before the paint shop.
Tampa do tensor, última peça antes da pintura


With the clear coat applied
Com a cobertura transparente


Some CNC at Aalto Fablab for the bridge cover
Um pouco de CNC no Aato Fablab para a peça de cobertura da ponte


Bridge cover and finger ramp done after lots of carving and sanding.
Cobertura da ponte e peças entre os captadores

Final steps: assembling electronics and hardware
Ultimos passos: instalando a parte eletronica e outras partes


 Instaling the pre-amp.
 Instalando o pré amplificador


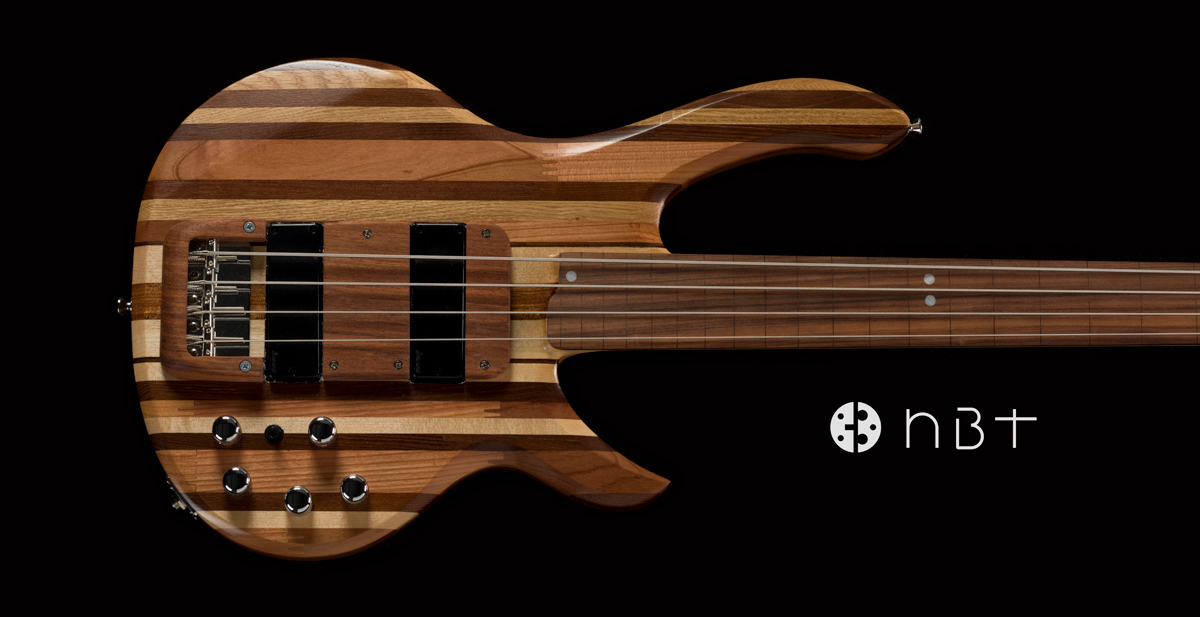
 And more pictures of the ready bass:
 E mais fotos do baixo pronto:


Also, a video (the sound quality is terrible since it was recorded with a cellphone), nevertheless, someway to hear a bit of how it sounds:
Ai vai também um video (a qualidade do áudio está horrível, pois foi gravado com celular), mas mesmo assim da pra sentir um pouco do som do baixo:


Hope you like it! It was a very nice process to go through! This project of more conscious musical instruments will continue (at least one or two every year).
Espero que gostaram! Foi um processo muito legal de fazer. Este projeto the instrumentos musicais mais conscientes vai continuar (espero poder fazer pelo menos um ou dois por ano).

See you!
Até mais!

Thanks!
Obrigado!

Project by/ projeto por Nicholas Torretta

Apr 11, 2013

VOQ meets Metropolia University


Hello everyone!
Olá à todos!!

Some weeks ago (March 1st) we had a very interesting and funny gathering with students of Environmental Engineering from Metropolia University (Vantaa - Finland). The students there are working in a artistic/creative project about up-cycling the campus' scraps and waste into art works or objects. Therefore VOQ, as Nicholas Torretta, was invited to hold an 2 hours experience about creative process, sustainability, arts and up-cycling.
Algumas semanas atrás (1.3) nós tivemos uma experiência muito divertida com estudantes de Engenharia Ambiental da Universidade Metropolia em Vantaa - Finlândia. Lá, os estudantes estão trabalhando em um projeto de reutilização de sucatas geradas no campus para criar um projeto criativo de fim artistico ou funcional. Para isso, o VOQ, la representado por Nicholas Torretta, foi convidado para realizar uma experiência de duas horas sobre processo criativo, sustentabilidade, artes e reutilização. 


In this mix of workshop, lecture, play, discussion and easygoing time we had many different and funny activities to change the mood into an open minded and creative environment. 
Nessa mistura de workshop, palestra, brincadeira, conversa e momento de lazer, tivemos atividades muito divertidas para criar um clima aberto e criativo.


The groups of  students are working on their projects now and we will open a space for them to show their results to you (if they want so, of course hehe). I am looking forward to see them! 
Os grupos de estudantes estão trabalhando em seus projetos e nós abriremos um espaço aqui para que eles mostrem os resultados (se assim quiserem, claro rs). Estou ansioso pra ver o que eles criarão!


It was a really pleasant experience for me, but I believe that better that seeing my side of the experience, would be even better to see the students' opinions about the experience. Therefore, please, if you were there, if you feel like commenting, leave you comment about how you felt it, it would be very nice for us and for everyone to know how it was and how it affected the creative work of your group.
Foi uma experiência muito boa, mas acredito que melhor do que saber a minha opinião sobre o processo, é melhor ainda ver a opinião dos que participaram do evento. Portanto, se você esteve lá e quer comentar sobre algo, deixe sua opinião sobre o que você achou da experiência e como ela afetou o trabalho criativo de seu grupo.

Looking forward to see the results of the group works!
Estamos ansiosos para ver o resultado dos grupos!

See you!
Até mais!


Nicholas Torretta

Jan 25, 2013

Incense holder from spoon/ porta incenso de colher


Hello! Happy new year! To start the year with good vibrations and good atmosphere, here is a very simple project to perfume your house! An simple incense holder made from a broken spoon and a small piece of wood.
Olá! Feliz ano novo! Para começar o ano com boas vibrações e boa atmosfera, aqui vai um projeto bem simples para perfurmar os novos ares! Um simples apoio para incensos feito a partir de uma colher e um pedaço de madeira.


All you need is: a broken spoon - this one had a plastic cable, which broke, leaving this perfect piece for our incense holder; pliers; superglue; a drilling machine with 2mm drill bit; a piece of wood (which can be substituted by washers, or any other thing you may find to make a support for the spoon)
Tudo o que você precisa é: uma colher quebrada- esta tinha um cabo de plastico que quebrou, deixando esta peça perfeita pro nosso incensário; alicate, cola superbonder, furadeira com broca de 2mm para metal, um pedaço de madeira (que pode ser substituido por arruelas ou qualquer outra coisa que você achar que sirva como base para a colher)


First you need to bend the spoon, with the pliers, so that the role at the end of it stays on top, this hole is where the incense stick will be supported.

Primeiro você precisa entortar a colher com o alicate de forma que o buraco na ponta da peça fique para cima, este buraco é onde o incenso ficará apoiado.


After that, mark where the end of the incense touches the spoon in a way that the higher part of the incense does not goes out from the spoon - so that the ashes falls on the spoon. For marking you can use the tip of a screw driver or any other sharp object. Be careful!
Feito isso, marque onde a base do incenso toca a colher, de forma que a ponta superior do incenso não fique para fora da mesma, desta forma as cinzas não cairão para fora da colher. Para marcar você pode usar uma chave de fenta ou qualquer outro objeto pontiagudo. Tenha cuidado


Now, in that little mark you made, use the drilling machine to deepen the mark. Note that you don't need to go through the metal, but just to make a small cavity to keep the incense stable.

Agora, na pequena marca que você fez, use a furadeira para afunda-la. Não é preciso atravessar a colher, mas só criar uma depressão para que o incenso fique estável.


After this is done, since the spoon is not really stable, let's go for the base. You can use whatever suits you. I found this piece of wood and decided to shape it a little bit to fit the spoon. 
Após isso, visto que a colher não é o objeto mais estável pra essa situação, e não queremos cinzas por todas as partes, vamos para a base. Eu achei este pedaço de madeira e resolvi modela-lo um pouco para acomodar a colher.


For that I widened the hole on top so that the spoon can stay more balanced there and so that there is more area for gluing it.  


Para isso eu abri o buraco em cima para ter mais area de contato e mais area para cola.


You can make whatever finishing you want, here I made some plain, "diamond", sanding and died it with a rosewood paint. 

Você pode fazer o acabamento que quiser, aqui eu resolvi dar umas lixadas retas, como um "diamante" e depois tingi com tintura avermelhada para madeira. 


For last but not least, put the superglue on the edge of the hole you made on the base and place the spoon there. Wait for it to dry, and it is ready! Easy as pie!


Por último e não menos importante, passe super bonder na quina do furo e posicione a colher. Espere secar e está pronto! Fácil!


Then you can to some drawings or whatever you feel like. I decided to draw the edges of the surfaces I sanded. Here it is:
Então você pode fazer o acabamento que quiser. Eu decidi contornar as faces que havia lixado. Aqui está:


Hope you liked it! 
Espero que tenham gostado!


Thank you!
Obrigado!


Project by/projeto por Nicholas Torretta

Nov 6, 2012

WDC Megapolis Workshop


Hello again!
Sorry for the delay, we've spent some time collecting the pictures, but now that we have them all, we can show you the result of the workshop!
This one, also for WDC 2012, again with a very nice partnership with the NGO Dodo, happened in their 7th edition of the yearly "Megapolis" event. This time it was in Kiasma Museum in Helsinki on the 6th of October. 

Olá, mais uma vez!
Gostaríamos de nos desculpar pelo atraso, gastamos algum tempo para conseguir reunir todas as fotos, mas agora que as temos, podemos mostrar o resultado do nosso workshop!
Desta vez, também para o WDC (World Design Capital) 2012 e com a ótima parceria com a NGO Dodo, aconteceu na 7ª edição do evento anual "Megapolis". O workshop ocorreu no Museu Kiasma em Helsink-Finlândia no dia 6 de Outubro.


The Megapolis event is an Dodo's project which consists in a day full of lectures, debates and side events (workshops) about the city of the future, this year's theme was "Makers in the city", therefore, about active citizens.
O evento Megapolis é um projeto criado pela Dodo que consiste em um dia de palestras, debates e eventos paralelos (workshops) sobre as cidades do futuro. Este ano o tema foi "Makers in the city", traduzindo, algo como "fazedores na cidade", logo, sobre cidadãos ativos.


There, VOQ was: Nicholas Torreta (Designer - Brazil) together with Anja-Lisa Hirscher (Designer - Germany), Kätlin Kangur (Designer - Estonia) and Vendula Jahanová (Psychologist - Czech Republic). We focused on the future makers: children! 
O VOQ foi composto por: Nicholas Torreta (Designer - Brasil) junto com Anja-Lisa Hirscher (Designer - Alemanha), Kätlin Kangur (Designer - Estonia) e Vendula Jahanová (Psicóloga - República Checa). Focamos o workshop nos criadores do futuro: as crianças!

It was an non-stop open workshop where children could join and do many different tasks. But let's not reveal everything right now, so, take a look at the pictures and you will see all the playful things that the little ones made there!
Fizemos um workshop aberto, sem intervalos, onde as crianças poderiam participar e realizar diferentes tarefas. Mas não vamos revelar tudo o que aconteceu agora, então, dê uma olhada nas fotos abaixo e você vai poder conferir as coisas  divertidas que os pequenos fizeram por lá!
Here we go!
Vamos lá!


"Draw the new city"! In this big canvas children took her time to draw how is the city they would like to live in.
"Desenhe a nova cidade"! Nessa grande tela, as crianças levaram o tempo necessário para  desenhar a cidade que elas gostariam de viver.


Felt batches and decorative fashion!
Colors, fun and concentration! An open opportunity for creativity!

Tecidos e moda decorativa!
Cores, diversão e concentração! Uma oportunidade para a criatividade!


Cardboard cars! 
Easy and fun! Be an car builder for a while and then....
Carros de papelão!
Fácil e divertido! Seja um construtor de carros por um tempo e então...


Vruuuuuuuuuumm!, make some noise and have fun!
Vruuuuuuuuumm! Faça o barulho e se divirta!


And here are some pictures where you can see everything going on at the same time! 4 hours of lots of fun and making!
A seguir, algumas imagens onde você pode ver como tudo aconteceu ao mesmo tempo! 4 horas de muita diversão, criação e "fazer"!


Hope you enjoyed!
Now, go out and play!
Thanks everybody who helped, participated and, of course, for all of you who supports us and is reading this right now! 
See you soon! 
Espero que tenham gostado!
Agora, é sua fez de criar e brincar!
Obrigado a todos que ajudaram, participara e, claro, a todos vocês que nos apoiam e estão lendo neste momento. 
Até mais!

Bye bye!
Now, go out and play!
Tchau, tchau!
Agora é a sua vez, vá se divertir!