
Hello, VOQers!
Olá, VOQers!
As promised, in this post we will learn how to make a simple and minimalist lamp using, again, discarded CDs / DVDs. As mentioned in the previous post, this is a very interesting material to be used and we can find it discarded in large quantities.
Assim como combinamos, neste post aprenderemos a fazer uma luminária simples, minimalista, utilizando novamente os CDs/DVDs descartados. Como comentamos no post anterior, esse é um material bem interessante para ser utilizado e que podemos encontra-lo descartado em grande quantidade.
In this project, I chose to use the internal area of the disc (the reading area) and the disc's simple shape as a esthetic concept for the object; using only seven discs. We know that their colour may vary from silver to gold or even green and blue; therefore, the use of this variation can be interesting. Let's see how it goes ...
Neste projeto, escolhi utilizar a área interna do disco (área de leitura do laser) como conceito estético para a peça, assim como sua forma simples utilizando apenas 7 discos. Sabemos que estes variam em algumas possibilidades de cores, tais como o prata, o dourado, verde e azul, então, utilizar-se dessa variação pode-se obter combinações interessantes. Vamos ver no que vai dar...

Lista de materiais: furadeira com broca pequena para madeira, tesoura, estilete, chaves de fenda e philips, serra manual, jogo de limas metálicas, cola, fita adesiva, 7 discos, pequenas abraçadeiras de nylon, gabarito e sistema elétrico para luminária (fio, interruptor, plug, soquete e lâmpada).

Iniciamos com o gabarito. Cada disco levará 4 furos, então devemos dividir a circunferência de 12 cm de diâmetro em 4 partes iguais com dois traços. Nas pontas de cada traço, marcamos os pontos de furação, dando 0,3 cm de distância da borda. Recortamos esse gabarito, o colamos num disco e fazemos as furações.
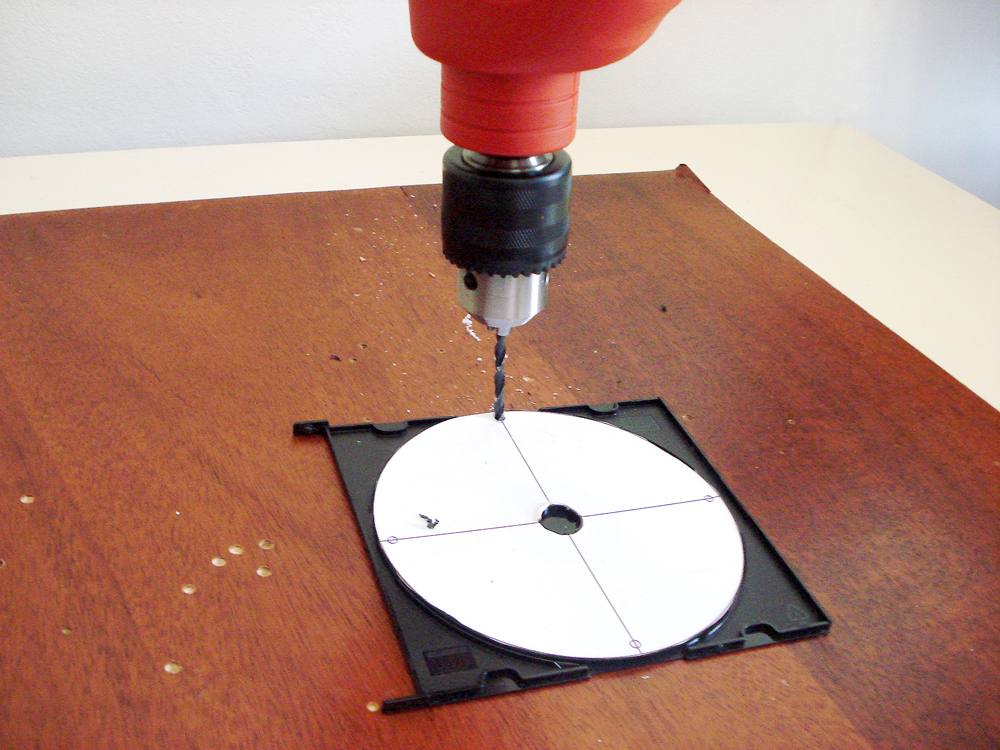
Em seguida furaremos os 6 discos. Utilize a caixinha acrílica de CDs para auxiliá-lo na furação. Coloque o disco a ser furado primeiramente, e por cima a peça com gabarito. colocando uma etiqueta adesiva entre eles, para fixa-los.

Faremos também uma abertura para a troca de lâmpadas. Para isso, além dos 4 furos padrões, recortamos uma circunferência de 11 cm de diâmetro, em um dos discos.

Agora com todos os discos furados, pegamos uma das peças e montamos o kit elétrico. Aqui montei o soquete e a saída do fio de energia, travados no disco com ajuda de uma trava branca e duas arruelas.

Na sequencia, fixamos uma peça na outra utilizando as abraçadeiras de nylon, passando-as entre as furações que fizemos. Não apertem as abraçadeiras, apenas as fixem suficientemente para que a estrutura se mantenha com certo equilíbrio.

After assembling all the parts, adjust fasten the clamps to its limits and then cut out the burrs.
Com toda a luminária montada, ajustamos as abraçadeiras apertando-as em seu limite e depois recortamos suas rebarbas.
Com toda a luminária montada, ajustamos as abraçadeiras apertando-as em seu limite e depois recortamos suas rebarbas.

O disco faltante servirá de tampa para a abertura da luminária, para que ela mantenha o mesmo aspecto em todas as suas faces. Para isso, abriremos os furos cortando-os com uma serra manual. Para dar acabamento utilize limas metálicas redondas ou canoas.

Assim que todas as aberturas estiverem prontas, encaixaremos o disco na abertura da luminária. Para trava-lo utilizaremos as pontas das abraçadeiras, girando-as para dentro do disco aplicado, assim como ilustrado na imagem ao lado.

To finish, assemble the other parts of the electrical system and then test. And the assembly of our multi-purpose lamp is completed!
Por fim, montamos as demais peças do sistema elétrico e o testamos em seguida. E aqui concluímos a montagem da luminária multiuso!

With just few pieces we can build a beautiful multipurpose luminaire. I call it "multipurpose" because you can use it in very different ways, one of them is the one you can see on the picture above, as a kind of wall sconce. However, it can be placed on tables, hang from the ceiling, resting on the floor, stack them ... it's you who sets the tone of the game. Enjoy!
Apenas com poucas peças conseguimos montar uma bela luminária multiuso. A chamo de multiuso, pois é possível utiliza-la de diversas formas, uma delas é a que você pode ver neste post. Ela aqui está como uma espécie de arandela, ou luminária de parede, mas pode ser colocada em mesas, penduradas no teto, descansando no chão, empilha-las... você é quem dá o tom da brincadeira. Divirta-se!
See you soon!
Até breve!
Project by/Projeto por: Marcelo Barros