Páginas

Showing posts with label Projects. Show all posts

May 24, 2013

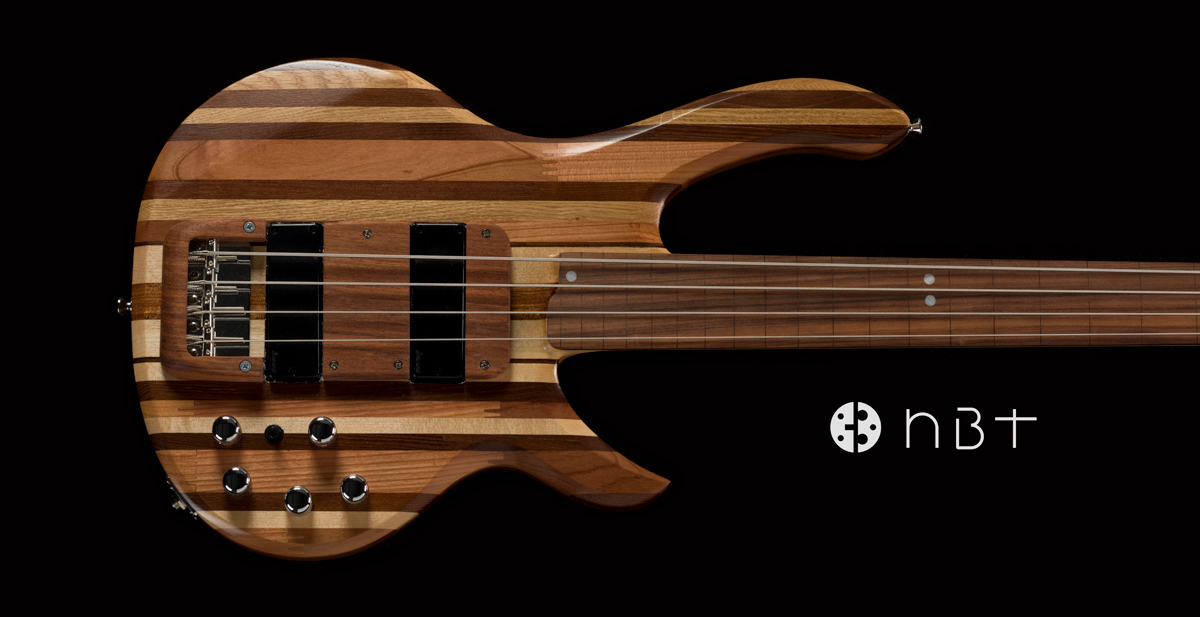
Electric Bass from wood scraps - Contra-baixo eletrico de sucata de madeira


Hello once again!
Olá mais uma vez!

We are preparing here to post the results from the Metropolia University's student groups, meanwhile I will publish this project which I accomplished by the beginning of the year. It is a 4 strings neck through bass guitar made from scraps of woods collected in wood workshops in Helsinki - Finland. It is a bit more "professional" project then the "easy to make" products we aim to post here, but I we had many people asking to see more about the building process of it. Here it goes. I won't describe each stage in details, because it is a very long process, but if you have any question, I will be happy to answer. 
Estamos preparando o post dos resultados dos alunos da Metropolia, mas enquanto isso vamos publicar esse projecto que eu completei no início do ano. É um contra-baixo eletrico inteiriço, fretless (sem trastes) feito com sucatas de madeira coletadas pelas marcenarias de Helsinki - Finlândia. É um projeto mais "proffisional" do que os "faceis de fazer em casa" que gostamos de publicar, mas como muita gente se pediu pra ver o processo de construção deste instrumento, aqui vai. Eu não vou detalhar cada etapa muito bem por ser um processo longo, mas se tiverem alguma questão, eu ficarei feliz em responder.


But first, some background info about the motivations I had to build this project (which will have continuations soon):  
Mas antes um pouco de informação sobre o porque que eu resolvi fazer esse projeto (que terá continuações em breve):

From the 50's until today the technological - and especially digital technologies - evolution was enormous (see the evolution of televisions, computers, mobile phones and so on, all the electronics in this period). However the electronic layout of guitars (standard passive settings) had no - or almost none - change or evolution. The construction of electric instruments still rely on the use of rare and mostly endangered species of wood. By seeing this gap between technological evolution and the "frozen in time" technology of electric systems of guitars I decided to build an instrument based on the most unwanted woods - the scraps; and then, use "high tech" technology to show that even with alternative materials, if we use the proper technology, we can have great sounding musical instruments with a more balanced environmental impact. For that I used (old) humbucker pickups and a 5.4 Bartolini internal pre-amp. The result was better than I expected. The aim was not to not use wood, since wood can be one of the more sustainable materials if used consciously (with sustainable forest management and etc.). Therefore the aim of to build a wood instrument based on the conscious use of resources - right woods, right pieces and technologies.

Dos anos 50 até hoje, a evolução tecnológica - e especialmente as digitais - foram enormes (veja, por exempleo, a evolução de televisores, computadores, celulares entre outros neste periodo). No entando, a parte eletrica de intrumentos musicais (comunmente passivos) mudou muito pouco ou quae nada. A construção destes instrumentos ainda se baseia muito no uso de madeiras raras muitas vezes ameaçadas de extinção. Por ver essa diferença entre a evolução tecnológia e a tecnologia parada no tempo usada nos instrumentos elétricos eu resolvi montar um istrumento com as madeiras menos desejadas - as sucatas. E ent~áo usar tecnologia "de ponta" para provar que mesmo com materiais alternativos, se ultilizamos a tecnologia adequada, podemos ter instrumentos com ótima sonoridade e menor impacto ambiental. Para isso eu usei uns humbuckes antigos (que eu tinha em casa) e um pre-amp Bartolini 5.4. O resultado foi melhor do que eu esperava! A intenção não foi de usar menos madeira ou de retirar o uso da madeira, visto que tal material pode ser um dos mais sustentáveis se usado conscientemente (com manejo florestal apropriado). Assim, o foco foi de contruir um instrumento utilizando-se conscientemente das recursos disponíveis - madeiras certas, peças e tecnologia apropriada.


Here is the process, hope you like it! 
Aqui está o processo, espero que gostem!


Preparing the "neck through" (core) piece from big pieces of wood.
Preparando a parte inteiriça "corpo - braço" com pedaços grandes de madeira


First leveling of the "core" and the assembly of the sides with many different pieces of wood.
Primeiro nivelamento to centro e montagem das laterais do corpo com diversos pedaços de madeira


Cutting everything near the final shape. Here I had to use a new rosewood piece for the fretboard
Cortando tudo próximo ao formato final. Aqui eu tive que usar uma peça de Pau ferro para a escala


Marking the headstock
Desenhando a mão do instrumento 


shaping the neck
Shape do braço


now on the headstock, sanding, drilling and small details
Agora na mão, lixamento, furação e alguns detalhes


headstock - neck shape
formato da parte mão - braço


Planning the body - core connection shape
Planejando a area de conexão do corpo com o braço


Marquetry for the headstock (with some help of laser cutting for the logo) 
Marchetaria para a "mão" (com um pouco de ajuda de corte a laser para o logo)


Applied marquetry
Marchetaria pronta


 The ready neck with fret marks, dots and radius
 O braço pronto, com marca das casas, marcaçoes e raio


Making the electronics cavities
Fazendo as cavidades para as partes elétricas


Finally gluing the core and the body "wings" together
Finalmente colando o centro e as "asas" do corpo juntas


Making the pickups cavities
Fazendo as cavidades dos captadores


 Almost there!
 Quase lá!


Shaping the body
Acertando o corpo


More carving
Mais shape no corpo


Finishing the back part
Terminando a parte traseira


Final sanding
Lixamento final


Truss rod cover, last peace before the paint shop.
Tampa do tensor, última peça antes da pintura


With the clear coat applied
Com a cobertura transparente


Some CNC at Aalto Fablab for the bridge cover
Um pouco de CNC no Aato Fablab para a peça de cobertura da ponte


Bridge cover and finger ramp done after lots of carving and sanding.
Cobertura da ponte e peças entre os captadores

Final steps: assembling electronics and hardware
Ultimos passos: instalando a parte eletronica e outras partes


 Instaling the pre-amp.
 Instalando o pré amplificador


 And more pictures of the ready bass:
 E mais fotos do baixo pronto:


Also, a video (the sound quality is terrible since it was recorded with a cellphone), nevertheless, someway to hear a bit of how it sounds:
Ai vai também um video (a qualidade do áudio está horrível, pois foi gravado com celular), mas mesmo assim da pra sentir um pouco do som do baixo:


Hope you like it! It was a very nice process to go through! This project of more conscious musical instruments will continue (at least one or two every year).
Espero que gostaram! Foi um processo muito legal de fazer. Este projeto the instrumentos musicais mais conscientes vai continuar (espero poder fazer pelo menos um ou dois por ano).

See you!
Até mais!

Thanks!
Obrigado!

Project by/ projeto por Nicholas Torretta

Jan 25, 2013

Incense holder from spoon/ porta incenso de colher


Hello! Happy new year! To start the year with good vibrations and good atmosphere, here is a very simple project to perfume your house! An simple incense holder made from a broken spoon and a small piece of wood.
Olá! Feliz ano novo! Para começar o ano com boas vibrações e boa atmosfera, aqui vai um projeto bem simples para perfurmar os novos ares! Um simples apoio para incensos feito a partir de uma colher e um pedaço de madeira.


All you need is: a broken spoon - this one had a plastic cable, which broke, leaving this perfect piece for our incense holder; pliers; superglue; a drilling machine with 2mm drill bit; a piece of wood (which can be substituted by washers, or any other thing you may find to make a support for the spoon)
Tudo o que você precisa é: uma colher quebrada- esta tinha um cabo de plastico que quebrou, deixando esta peça perfeita pro nosso incensário; alicate, cola superbonder, furadeira com broca de 2mm para metal, um pedaço de madeira (que pode ser substituido por arruelas ou qualquer outra coisa que você achar que sirva como base para a colher)


First you need to bend the spoon, with the pliers, so that the role at the end of it stays on top, this hole is where the incense stick will be supported.

Primeiro você precisa entortar a colher com o alicate de forma que o buraco na ponta da peça fique para cima, este buraco é onde o incenso ficará apoiado.


After that, mark where the end of the incense touches the spoon in a way that the higher part of the incense does not goes out from the spoon - so that the ashes falls on the spoon. For marking you can use the tip of a screw driver or any other sharp object. Be careful!
Feito isso, marque onde a base do incenso toca a colher, de forma que a ponta superior do incenso não fique para fora da mesma, desta forma as cinzas não cairão para fora da colher. Para marcar você pode usar uma chave de fenta ou qualquer outro objeto pontiagudo. Tenha cuidado


Now, in that little mark you made, use the drilling machine to deepen the mark. Note that you don't need to go through the metal, but just to make a small cavity to keep the incense stable.

Agora, na pequena marca que você fez, use a furadeira para afunda-la. Não é preciso atravessar a colher, mas só criar uma depressão para que o incenso fique estável.


After this is done, since the spoon is not really stable, let's go for the base. You can use whatever suits you. I found this piece of wood and decided to shape it a little bit to fit the spoon. 
Após isso, visto que a colher não é o objeto mais estável pra essa situação, e não queremos cinzas por todas as partes, vamos para a base. Eu achei este pedaço de madeira e resolvi modela-lo um pouco para acomodar a colher.


For that I widened the hole on top so that the spoon can stay more balanced there and so that there is more area for gluing it.  


Para isso eu abri o buraco em cima para ter mais area de contato e mais area para cola.


You can make whatever finishing you want, here I made some plain, "diamond", sanding and died it with a rosewood paint. 

Você pode fazer o acabamento que quiser, aqui eu resolvi dar umas lixadas retas, como um "diamante" e depois tingi com tintura avermelhada para madeira. 


For last but not least, put the superglue on the edge of the hole you made on the base and place the spoon there. Wait for it to dry, and it is ready! Easy as pie!


Por último e não menos importante, passe super bonder na quina do furo e posicione a colher. Espere secar e está pronto! Fácil!


Then you can to some drawings or whatever you feel like. I decided to draw the edges of the surfaces I sanded. Here it is:
Então você pode fazer o acabamento que quiser. Eu decidi contornar as faces que havia lixado. Aqui está:


Hope you liked it! 
Espero que tenham gostado!


Thank you!
Obrigado!


Project by/projeto por Nicholas Torretta

Aug 22, 2012

Napkin holder from CD/DVD - Porta guardanapos de CD/DVD


Hello, VOQers!
Olá, VOQers!

Yes, it seems that we have no shame! It has been a long time since we last uploaded a project here! And we even had complains about our delay! no coments....
É, parece que não tomamos vergonha na cara, mesmo! Já faz um bom tempo que não aparecemos por aqui e postamos um novo projeto e já tivemos até reclamações. Sem palavras.

Nevertheless, as an attempt to redeem us from our long time without projects, here we are with another eccentric invention that we, full or courage, dare to call as a design object! Well, apart from any jokes, today we will make a very simple project, one which uses very little material and is also very simple to build: a napkin holder from a CD/DVD
Mas na tentativa de nos redimir (sempre), aqui estamos com mais outra de nossas excêntricas invenções, que temos coragem de chamar de "peças de design". Bom, brincadeiras a parte, hoje desenvolvemos um projeto muito simples, utilizando quase nada de materiais e de execução bem rápida: Trata-se de um porta-guardanapos feito com CD/DVD.


Ready? Let's go ...
Preparados? Mãos a obra...


Bill of Materials: 1 sheet of paper, 1 instant adhesive, pencil, eraser, ruler and a cutter with a sharp blade.
Lista de materiais: 1 folha de papel em branco, 1 cola instantânea, lápis, borracha, régua e estilete com lâmina bem afiada.


We start by drawing a 12cm square on the paper. on this square we draw two lines with 2,4cm distance between them, just as seen in the picture. This will be our cutting template.
Iniciamos desenhando na folha de papel um quadrado de 12 cm de lado, e dois riscos centralizados com uma distância de 2,4 cm entre eles, assim como vemos na imagem ao lado. Este será o nosso gabarito.
Then we place the disc on top of the template, centralizing it in the square. After that we draw on the disc the two lines that we had on the template.
Em seguida, colocamos o disco em cima do gabarito, acomodando-o de forma centralizada, para que fique dentro do quadrado. Marcamos nele com o lápis, os dois riscos centrais.
After marking it cut the disc exactly on the marks, with the cutter. You may use the back of a ruller do guide the cutter through the line. Jus as seen on the picture
Feito os riscos, o disco deverá ser cortado com o estilete exatamente nestas mesmas marcações. Para servir de guia para o estilete e proteger sua mão, utilize as costas (parte mais alta) da régua, assim como está no exemplo ao lado.
 With the disc cut into three parts sand its ends with 120 sandpaper, to make the surface more smooth and well finished.
Com o disco cortado em três partes, lixe suas extremidades com lixa d'água 120, para deixar a superfície mais bem acabada e lisa.
Finally, apply the adhesive on the edges of the pieces, glueing the sides on top of the central piece, which will then become the base of the napkin holder.
Por fim aplique a cola instantânea nas extremidades das peças, colando as laterais do disco por cima da peça central. Esta servirá de base para o porta-guardanapos. 

Now just wait for the glue to get dry and "voila"! You have a brand new napkin holder to renew your dining toold. I chose this blue whit white and orange details CD because it would match with my set of turquoise and yellow table cloths. The interesting thing is that I ended by not using more material to give new "finishing" to the piece because it was "almost" ready.
Agora basta aguardar a secagem e pronto! Temos um novíssimo porta-guardanapos para deixar sua mesa de jantar inusitada e renovada. Eu escolhi este CD azul com detalhes em branco e laranja, pois ele poderia ser uma ótima combinação com o meu jogo de jantar azul turquesa e sousplats amarelos. O interessante é que acabei por não utilizar de mais material para dar novo acabamento a peça, pois ela já estava "quase" pronta.


And ou can do the same, since the project can be done as you prefer, only depending on your creativity and imagination.
E você poderá fazer o mesmo, uma vez que este projeto pode ser feito da forma que desejar, dependendo apenas de sua criatividade e disponibilidade para faze-lo.


See you soon!
Até breve!


Project by/Projeto por: Marcelo Barros

May 29, 2012

Porta-CDs feito com discos / CD stand made from old CDs


Hello, VOQers!
Olá, VOQers!


We would like to apologize for the long gap between the projects and posts here. We went through some technical and personal problems which ended by messing with the continuity of our posts. In order to apologize, in this post we bring to you an unusual project, nevertheless, still simple and interesting: a ​CD stand made from old discarded CDs.
Gostaríamos de nos desculparmos pela grande demora em retomarmos os projetos e posts no blog, mas passamos por alguns problemas técnicos e pessoais, que nos atrapalharam um pouco com a continuidade e periodicidade de postagens. Como forma de nos redimirmos, trouxemos para este novo post um projeto inusitado, diferente, simples e interessante: Trata-se de um porta CDs feito com os próprios discos descartados.


As we all knownot all CDs are discarded. Many of them stay on our shelvesfiguring in our collections of music albumssometimes competing for a place with vinyl records and DVDs. However, often abandoned due to our friend, the MP3- Nevetheless, we still store our CDs with love and patience, even as decorative pieces with its wonderful layers of colorsBearing this in mind, we developed a CD stand which can accommodate some of those most cherished albums from your collection, therefore highlighting them among your collection.
Como todos sabemos, nem todos os CDs são descartados, ficando guardados em nossas estantes, figurando em nossas coleções de álbuns de música, e as vezes disputando o lugar com discos de vinil e DVDs. Mesmo muitas vezes abandonados, por conta do nosso amigo MP3, os guardamos com carinho e resignação, servindo até como peças decorativas com suas maravilhosas capas e composições de cores. Levando isso em conta, pensamos em desenvolver um porta CDs, que acomodasse alguns daqueles álbuns mais queridos de sua coleção, para que pudessem desfilar como as vedetes de sua decoração.


Making CD stand with CDs is somewhat unexpected, isn't it? This idea seemed so crazy that prompted me to do it, and share the fun with youJust to remember, this is a material that we find discarded in large quantitiesmaking it even more interesting for the project. So, let's go to work?
Fazer um porta CDs com CDs é um tanto inesperado, não é mesmo? E a ideia soa tão maluca, que me instigou a faze-lo e dividir a brincadeira com vocês. Só para lembrar, esse é um material que podemos encontra-lo descartado em grande quantidade, tornando-o mais interessante ainda para o projeto. Então, mãos a obra?


List of materials: drill and drilling bits, scissors, cutter, hand saw, wrench, glue, tape, mask and goggles, spray paint, sandpaper, newspapers, 1 bar with thread, 2 screws, 6 closed-end-cap nut, 6 washers, 1 meter long hose and 22 discs.
Lista de materiais: furadeira e broca, tesoura, estilete, serra manual, chave fixa, cola, fita adesiva, máscara e óculos, tinta spray, lixas, jornais, 1 barra com rosca, 2 parafusos, 6 porcas calotas e 6 arruelas, 1 metro de mangueira e 22 discos.

We start with templates. The first will be used to drill the 21 discs which will be the "body" of the CD stand. Dividing the disk into 4 equal parts with two lines, drill 3 holes as shown in the picture.
Iniciamos com os gabaritos. O primeiro gabarito servirá para furar os 21 discos que comporão o corpo do porta CDs.  Dividindo o disco em 4 partes iguais com dois traços, faça 3 furos conforme o exemplo ao lado.

The template is to create the support of the stand. Divide a disc in half. Take one half and place on top of the previous template, aligning the base, then mark the holes as shown in the picture.
O segundo gabarito dará origem aos pés do porta CDs. Divida o disco ao meio. Pegue uma metade e a posicione em cima do gabarito anterior, alinhando as bases e marque as furações, assim como o exemplo.


With the templates ready, just cut them and paste them on CDs to use as a templates to drill the CDs
Com os gabaritos devidamente desenhados e marcados, basta recorta-los e cola-los em discos, para servirem de gabaritos físicos para a furação das peças.

Now we will drill the holes on the CDs. Place the disc to drilled into the cradle and place above it the disc-template created on the previous step. You may use some adhesive tape between them to keep them in place.
Agora furaremos os discos. Coloque o disco a ser furado encaixado no berço e por cima o disco/gabarito. Fixe-os com uma etiqueta adesiva entre eles.


Then, we takethe CD which has the different holes set (from the second template) and saw it in half. When finished, sand the piece, removing burrs and smoothing the edges.
Em seguida, peguemos o CD com as furações diferentes para serra-lo ao meio. Ao finalizar, lixe a peça, retirando as rebarbas e dando acabamento.

When the previous steps are done,, clean the discs with a cloth moistened with alcohol. With a sandpaper we sand the inner side (the "laser reading side") so that it became slightly rough, therefore allowing the ink to be applied.
Finalizada as etapas anteriores, limpe os discos com um pano umedecido com álcool. Com uma lixa, gastemos o lado de leitura do laser, para que fiquem levemente ásperos para a tinta conseguir se fixar.

Now, in a well ventilated place, we cover the floor with newspaper and place the cds side by side so that they can be painted easily. Use spray paint to achieve uniformity.
Organizamos um espaço arejado, forrando o chão com jornais, dispondo todos os discos lada a lado para que possam ser pintados com facilidade. Utilize tinta spray para conseguir uniformidade no acabamento.


Note: To paint them with spray paint,, the can has to be between 40 and 45cm distant from the discs, so that just a thin, "dust-looking", layer covers the discs. Wait about two hours to paint them again and repeat the procedure untill they are fully covered. It takes around 5 times to complete. We have to do it this way because the glazed area of the disks does not allow the ink to fix easily. 
Obs.: Para pinta-los com a tinta spray, deveremos jogar a tinta numa distância entre 40 a 45 cm dos discos, pulverizando a tinta de forma despretensiosa, deixando que uma leve poeira os cubra, nessa primeira de mão. Espere em torno de 2 horas para a segunda de mão e repita o procedimento. Para que os discos fiquem bem acabados, serão necessárias quatro a cinco de mãos. Esse método é feito dessa forma, pois a área acetinada dos discos não permite que a tinta se fixe facilmente. Você poderá utilizar uma seladora plástica como base para tinta, mas o trabalho com a seladora será praticamente o mesmo, porém gastará mais tempo e dinheiro.


Take the bar and mark it with 25cm long as shown in the picture. Cut the bar with a handsaw and repeat the procedure so that you get two small bars.
Pegue a barra de rosca e marque a medida 25 cm, assim como mostra a imagem. Corte a barra com uma serra manual e repita a operação para que você obtenha duas pequenas barras. 


Take up the transparent hose and mark at every 1 cm, cut with scissors. We will need 40 pieces of this.
Pegue agora a mangueira transparente e faça marcas de 1 cm de distância entre elas, e as corte com uma tesoura. Precisaremos de 40 peças iguais.

Take a disc and a "support-disc" and attach them using the rod, screws, washers and closed- end-cap nuts. When this is done, place a piece of the hose on each bar and then attach another disc, just as shown in the picture.
Pegue um disco e um pé e os una com as barras com rosca, parafuso, arruelas e porcas calota. Feito isso, coloque um pedaço de mangueira em cada barra e na sequência outro disco, assim como na imagem ao lado.


Repeat this step until you close the other end of the object with the last disc and the second "support-disc".
Repita essa sequencia até fechar a outra extremidade da peça, fechando-a com o ultimo disco e o segundo pé.


Ready! We just assembled the newest CD stand to make your collection way more fun and to bring some order and irreverence to your record collection. We hope you enjoyed it and that you will try to assemble your own!
Pronto! Acabamos de montar o mais novo porta CDs para divertir sua decoração e trazer um pouco de ordem e irreverência para a sua coleção de discos. Esperamos que tenha gostado e que tente executá-lo de verdade!


It is worth noting that this project can be done whit the size and shape you may preffer, and you can finish it as you want (different colours, etc.)it just depends on on your creativity and willingness to produce it. Feel free to experiment, innovate and break rules. That's what makes our life more fun and "tasty"!
Vale a pena ressaltar, que este projeto pode ser feito no tamanho e formato que desejar, assim como possuir o acabamento que mais o atrair, dependendo apenas de sua criatividade e disponibilidade de produzi-lo. Fique a vontade para experimentar, quebrar regras e inovar. Isso é que faz nossa vida ser mais rica e saborosa! 


See you soon!
Até breve!

Project by/Projeto por: Marcelo Barros