Páginas

Sep 17, 2012

WDC Workshop


Hello!
Olá

So, as you may know, we just had the workshop at the World Design Capital event in Helsinki - Finland on the 9th of September. Now Let's see a bit of what happened there!

Como vocês devem saber, acabamos de fazer o workshop no evento Capital Mundial do Design em Helsinki - Finlândia no último dia 9. Agora vamos ver um pouco do que aconteceu por lá!

With a group of ten designers, each one from a different corner of the Earth (Estonia, India, Germany, Canada, South Korea, Iran, Colombia and of course, Brazil), we started the workshop by doing some activities and discussions on issues such as the status quo of design, consumerism, sustainability and vernacular design  among other issues that were brought up during the conversation. Unfortunately we have no pictures of this part of the workshop, but it will appear in a video that is being edited by our colleague H. Pakbeen. Therefore, soon you will be able to see a bit of "moving action"!
Com um grupo de dez designers, cada um de um canto do mundo (Estônia, India, Alemanha, Canadá, Coréia do Sul, Irã, Colombia e claro, Brasil), começamos o workshop com uma atividades e discussões sobre as temáticas do status quo do design, consumismo, sustentabilidade e design vernacular, entre outros assuntos que foram trazidos durante a conversa. Infelizmente não temos fotos desta etapa, porém ela aparecerá em um video que esta sendo editado por nosso colega H. Pakbeen sobre o workshop. Portanto, aguardem para ver um pouco da ação em movimento!

Well, back to the process, after some discussion and exercises to raise awareness about the importance of objects in our everyday live, we went for the "hands on" part of the workshop. The group was splited into two teams, and, from a pile os scraps, they had to build chairs with the record time of two hours!
Bom, voltando ao processo, após a discussão e alguns exercícios de conscientização sobre a importância dos objetos em nosso cotidiano, partimos para o "mãos na massa", onde o grupo se dividiu em duas equipes, e, no meio da pilha de sucata, tiveram que desenvolver cadeiras em tempo recorde de 2 horas!


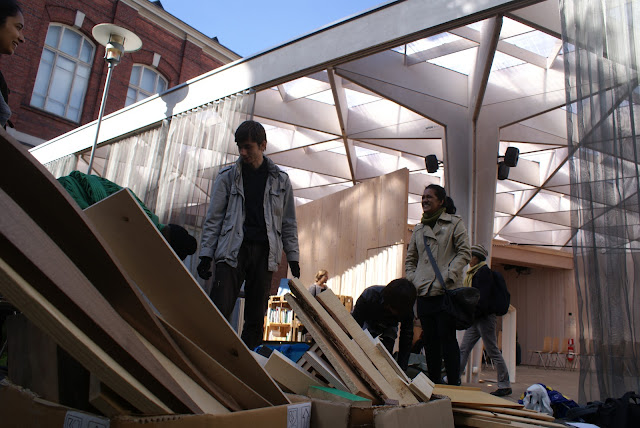
This was the beginning: the groups exploring the material, to get to know the pieces and its possibilities. It was a deep dive in the junk!
Isso foi o começo: os grupos explorando o material, pra conhecer as peças e suas possibilidades. Foi um mergulho profundo na sucata!
Explorations and experimentation!! Sometimes it works, sometimes not, but the important thing is to experiment, find out what the material can  and can not do. Building is very different from drawing, because as they say, "the paper accepts everything" but the materia ... That is why during this production phase the groups could not draw, but, instead, make!
Explorações e experimentações! Às vezes dá certo, às vezes não, mas o importante é experimentar, é descobrir o que o material aceita e o que não. Construir é muito diferente de desenhar, pois como dizem, "o papel aceita tudo", já a materia... É por isso que durante a produção os grupos não puderam desenhar, mas sim fazer.

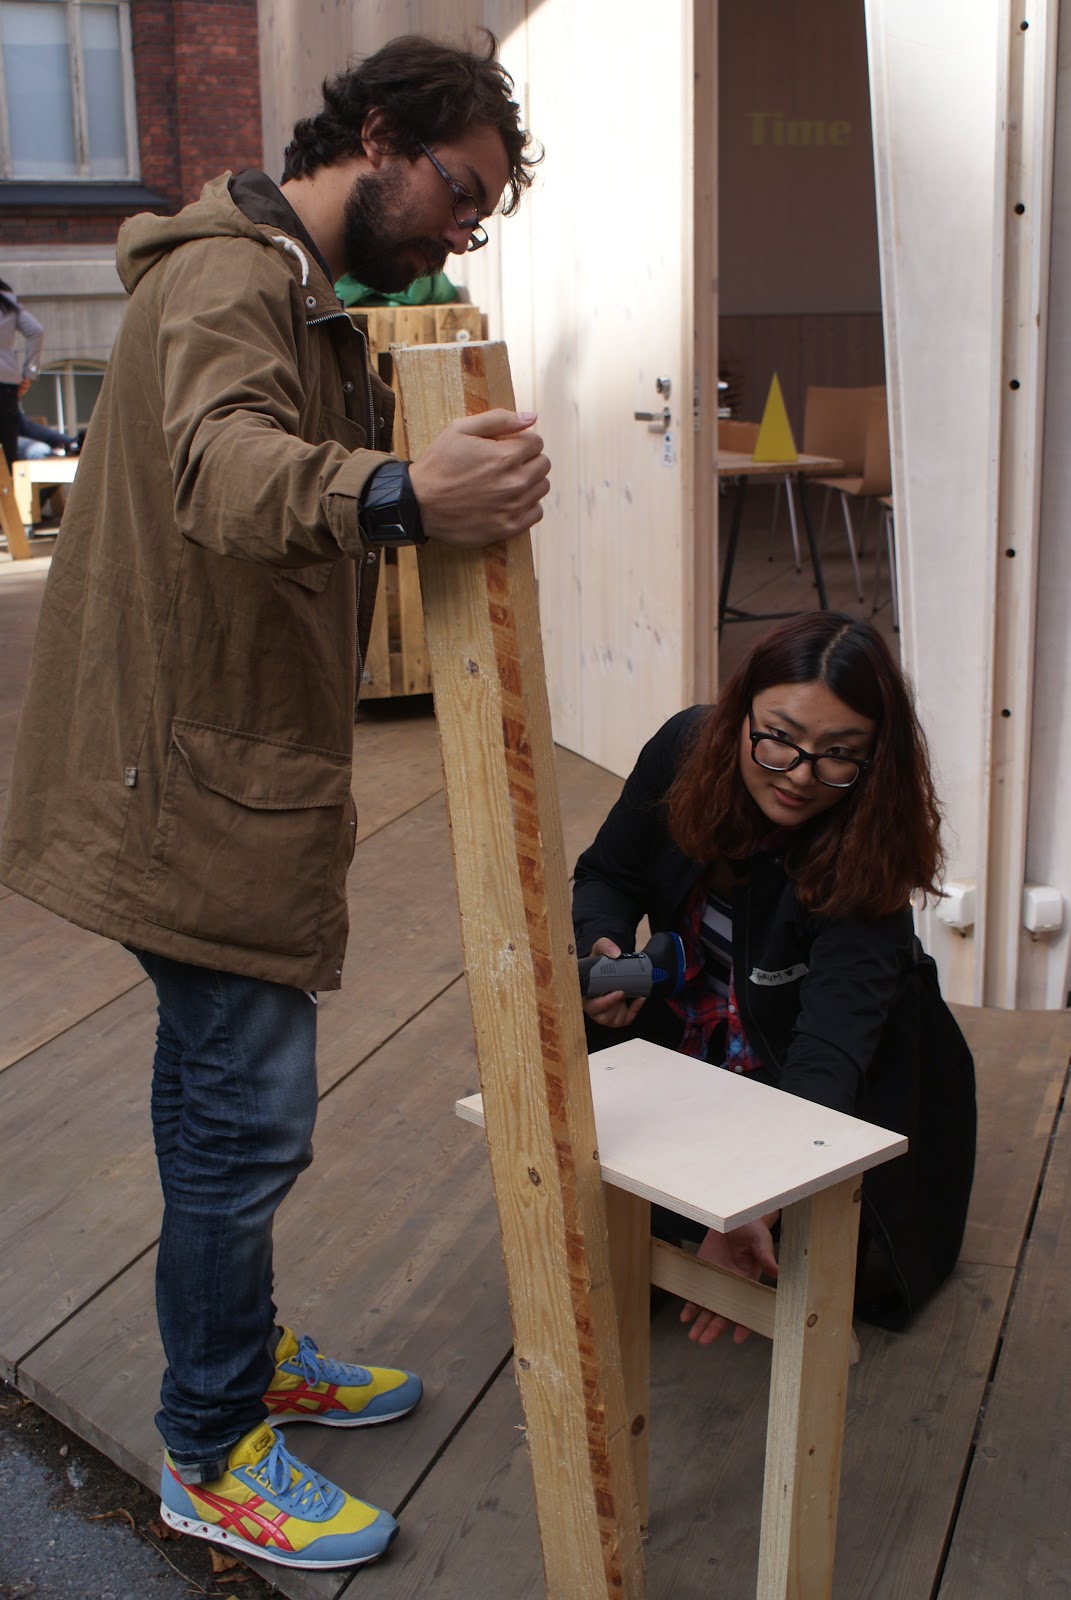
Ideas taking shape!
Ideias tomando forma!

The first group begins to get close to a chair!
O primeiro grupo começa a chegar perto de uma cadeira!
The second group is not behind and is also successful at building their chair!
O segundo grupo não fica atrás e também tem sucesso construindo a sua! 
Most important: teamwork! Everyone together for a common goal.
O mais importante: trabalho em equipe! Todos juntos para um mesmo objetivo.

Named as "the Knowledge chair", the first chair is ready! Notice how they solved the comfort issue in the headrest!
Apelidada de "cadeira do conhecimento", a primeira cadeira fica pronta! Vejam que interessante como resolveram o problema de conforto no apoio da cabeça!
The workshop drew attention of who was around! Time for a photo shoot for the group of tourists that surrounded the workshop!
E o workshop chamou atenção de quem estava por perto! Hora para uma sessão de fotos para os grupo de turistas que rodearam o workshop! 


And is the result! But wasn't there only two groups?! Yes! But the participants got excited about the idea and started making chairs with everything!
E aqui a somatória dos resultados! E olhem só! não eram só dois grupos? É o pessoal se empolgou com a ideia e começaram a fazer cadeiras com tudo que era possível! 


See the details of each chair:
Vejam os detalhes de cada uma:


Anja's "mushroom chair"! Simple and usefull! Resembles the milking stools, doesn't it?
A "cadeira cogumelo" de Anja! Simples e eficaz! Lembra muito os banquinhos de ordenhar, não? 
The "Chair box" by Hessam! But is it only a box?
A "Cadeira caixa" de Hessam! Mas é somente uma caixa?
No! Look how nicely he created a structure inside to make "the world's strongest cardboard box"!
 Não! vejam só que legal a estrutura feita por dentro, para criar a caixa de papelão "mais forte do mundo"! 
The "knowledge chair" posing with all its wisdom.
A "cadeira do conhecimento" posando com todo seu saber. 
Here the chair of the second group, named "rocking chair - redefined"! But why this name? Because the "rocking" is on the backrest! and laterally! It is very effective to lull babies!
Aqui a cadeira do segundo grupo, apelidada de "cadeira de balanço - a reinvenção". Porque esse nome? porque o balanço dela está no encosto! e lateralmente! Foi comprovada a sua eficácia para ninar bebês!
The "wannabe a chair", that I tried to make, but time was too short.
A "eu quero ser uma cadeira", que tentei fazer, mas o tempo foi curto.
And the fun "poney chair" by June! Works as chair and as a toy! Kids will love!
E a divertida "cadeira poney" da June! Serve como cadeira e como brinquedo! A crianças vão adorar! 
Some of the participants had to leave before the end of the workshop, but, for those who stayed , here is a photo of the group that participated in this vary creative experience that we had!
Alguns tiveram que partir antes do encerramento do workshop, mas para aqueles que ficaram, eis aqui a foto do grupo participante dessa experiência super criativa que tivemos!


To see more photos of the workshop, please visit our Facebook page: facebook.com/viraroque
Para ver mais fotos do processo, acesse nossa página do Facebook: facebook.com/viraroque

Before saying goodbye, I want to thank everyone who participated in the event, the Dodo NGO, Aalto University, and the entire WDC team who made this workshop come true! Thank you!
Antes de me despedir, quero agradecer muito a todos que participaram do evento, à ong Dodo, à Aalto University, e à toda equipe do projeto WDC que fizeram esse workhop se realizar! Muito obrigado!

See you soon with more projects, and, the video about the workshop (it may take a while)! 
Now VOQ cames with full power!
Até a proxima com mais projetos e, em breve, teremos o vídeo sobre o workshop! Aguardem! Agora o VOQ vem a todo vapor!

Bye bye!
Tchau tchau!

Sep 8, 2012

Workshop tomorrow! amanhã!!!


The World Design Capital Workshop is tomorrow! 
Hope to se you all at the Pavilion, at 11 am!

For those who can't come, we will publish the results here in a couple of days!


--
O workshop na Capital Mundial do Desigh é amanhã! Para os que não poderão comparecer, publicaremos o resultado aqui no blog dentro de alguns dias!

Aug 22, 2012

Napkin holder from CD/DVD - Porta guardanapos de CD/DVD


Hello, VOQers!
Olá, VOQers!

Yes, it seems that we have no shame! It has been a long time since we last uploaded a project here! And we even had complains about our delay! no coments....
É, parece que não tomamos vergonha na cara, mesmo! Já faz um bom tempo que não aparecemos por aqui e postamos um novo projeto e já tivemos até reclamações. Sem palavras.

Nevertheless, as an attempt to redeem us from our long time without projects, here we are with another eccentric invention that we, full or courage, dare to call as a design object! Well, apart from any jokes, today we will make a very simple project, one which uses very little material and is also very simple to build: a napkin holder from a CD/DVD
Mas na tentativa de nos redimir (sempre), aqui estamos com mais outra de nossas excêntricas invenções, que temos coragem de chamar de "peças de design". Bom, brincadeiras a parte, hoje desenvolvemos um projeto muito simples, utilizando quase nada de materiais e de execução bem rápida: Trata-se de um porta-guardanapos feito com CD/DVD.


Ready? Let's go ...
Preparados? Mãos a obra...


Bill of Materials: 1 sheet of paper, 1 instant adhesive, pencil, eraser, ruler and a cutter with a sharp blade.
Lista de materiais: 1 folha de papel em branco, 1 cola instantânea, lápis, borracha, régua e estilete com lâmina bem afiada.


We start by drawing a 12cm square on the paper. on this square we draw two lines with 2,4cm distance between them, just as seen in the picture. This will be our cutting template.
Iniciamos desenhando na folha de papel um quadrado de 12 cm de lado, e dois riscos centralizados com uma distância de 2,4 cm entre eles, assim como vemos na imagem ao lado. Este será o nosso gabarito.
Then we place the disc on top of the template, centralizing it in the square. After that we draw on the disc the two lines that we had on the template.
Em seguida, colocamos o disco em cima do gabarito, acomodando-o de forma centralizada, para que fique dentro do quadrado. Marcamos nele com o lápis, os dois riscos centrais.
After marking it cut the disc exactly on the marks, with the cutter. You may use the back of a ruller do guide the cutter through the line. Jus as seen on the picture
Feito os riscos, o disco deverá ser cortado com o estilete exatamente nestas mesmas marcações. Para servir de guia para o estilete e proteger sua mão, utilize as costas (parte mais alta) da régua, assim como está no exemplo ao lado.
 With the disc cut into three parts sand its ends with 120 sandpaper, to make the surface more smooth and well finished.
Com o disco cortado em três partes, lixe suas extremidades com lixa d'água 120, para deixar a superfície mais bem acabada e lisa.
Finally, apply the adhesive on the edges of the pieces, glueing the sides on top of the central piece, which will then become the base of the napkin holder.
Por fim aplique a cola instantânea nas extremidades das peças, colando as laterais do disco por cima da peça central. Esta servirá de base para o porta-guardanapos. 

Now just wait for the glue to get dry and "voila"! You have a brand new napkin holder to renew your dining toold. I chose this blue whit white and orange details CD because it would match with my set of turquoise and yellow table cloths. The interesting thing is that I ended by not using more material to give new "finishing" to the piece because it was "almost" ready.
Agora basta aguardar a secagem e pronto! Temos um novíssimo porta-guardanapos para deixar sua mesa de jantar inusitada e renovada. Eu escolhi este CD azul com detalhes em branco e laranja, pois ele poderia ser uma ótima combinação com o meu jogo de jantar azul turquesa e sousplats amarelos. O interessante é que acabei por não utilizar de mais material para dar novo acabamento a peça, pois ela já estava "quase" pronta.


And ou can do the same, since the project can be done as you prefer, only depending on your creativity and imagination.
E você poderá fazer o mesmo, uma vez que este projeto pode ser feito da forma que desejar, dependendo apenas de sua criatividade e disponibilidade para faze-lo.


See you soon!
Até breve!


Project by/Projeto por: Marcelo Barros

Aug 13, 2012

World Design Capital Workshop

                                                                                        picture by Hesam Pakbeen

Hello, VOQers!

Olá, VOQers! 

We are here to proudly inform the VOQ is going to the World Design Capital (WDC)! The WDC is a event that happens every two years, each time at a different city, which is presented as the big center of design. This year is time for Helsinki - Finland, to be the World Design Capital. And we will be there representing Brazil!

Estamos aqui para, orgulhosamente informar que o VOQ estará presente na Capital Mundial do Design (World Design Capital - WDC)! O WDC é um evento bienal, que acontece cada vez em uma cidade diferente, que é então apresentada como o centro do design no mundo. Esse ano é a vez de Helsinki - Finlândia ser a capital mundial do design, e nós estaremos lá representando o Brasil!

Our participation, in partnership with Tuunamo (Dodo org), will be a workshop on the 9th of September (Sunday) from 11:00 am to 3:00 pm entitled "VOQ - rethinking objects" under the "Tuunamo goes Pavilion: Customisation through the weekend!" event.

Nossa participação, em parceria com Tuunamo (Dodo org), será com um workshop no dia 9 de Setembro (Domingo) das 11h até as 15h chamado  "VOQ - rethinking objects" pelo evento "Tuunamo goes Pavilion: Customisation through the weekend!".


As usualy, it will be an intense, hands-on, learning by doing event. It is free of charge, all you need to do is to be there a litle bit before 11am!
Address:Ullanlinnankatu 2-4 - Helsinki, Finland
Como sempre, será um evento intenso, de mão na massa e de aprender fazendo. É gratuito, portanto, tudo o que tem que fazer é estar lá um pouco antes das 11h!
Enderenço Ullanlinnankatu 2-4 - Helsinki, Finland

See you there!

Nos vemos lá!

Any doubt, please leave a comment or contact us at viraroque@gmail.com!

Qualquer dúvida, deixe um comentário ou nos envie um email no viraroque@gmail.com!

Please note that the workshop will happen with a minimum of 10 participants!

O workshop acontecerá com um mínimo de 10 participantes!

May 29, 2012

Porta-CDs feito com discos / CD stand made from old CDs


Hello, VOQers!
Olá, VOQers!


We would like to apologize for the long gap between the projects and posts here. We went through some technical and personal problems which ended by messing with the continuity of our posts. In order to apologize, in this post we bring to you an unusual project, nevertheless, still simple and interesting: a ​CD stand made from old discarded CDs.
Gostaríamos de nos desculparmos pela grande demora em retomarmos os projetos e posts no blog, mas passamos por alguns problemas técnicos e pessoais, que nos atrapalharam um pouco com a continuidade e periodicidade de postagens. Como forma de nos redimirmos, trouxemos para este novo post um projeto inusitado, diferente, simples e interessante: Trata-se de um porta CDs feito com os próprios discos descartados.


As we all knownot all CDs are discarded. Many of them stay on our shelvesfiguring in our collections of music albumssometimes competing for a place with vinyl records and DVDs. However, often abandoned due to our friend, the MP3- Nevetheless, we still store our CDs with love and patience, even as decorative pieces with its wonderful layers of colorsBearing this in mind, we developed a CD stand which can accommodate some of those most cherished albums from your collection, therefore highlighting them among your collection.
Como todos sabemos, nem todos os CDs são descartados, ficando guardados em nossas estantes, figurando em nossas coleções de álbuns de música, e as vezes disputando o lugar com discos de vinil e DVDs. Mesmo muitas vezes abandonados, por conta do nosso amigo MP3, os guardamos com carinho e resignação, servindo até como peças decorativas com suas maravilhosas capas e composições de cores. Levando isso em conta, pensamos em desenvolver um porta CDs, que acomodasse alguns daqueles álbuns mais queridos de sua coleção, para que pudessem desfilar como as vedetes de sua decoração.


Making CD stand with CDs is somewhat unexpected, isn't it? This idea seemed so crazy that prompted me to do it, and share the fun with youJust to remember, this is a material that we find discarded in large quantitiesmaking it even more interesting for the project. So, let's go to work?
Fazer um porta CDs com CDs é um tanto inesperado, não é mesmo? E a ideia soa tão maluca, que me instigou a faze-lo e dividir a brincadeira com vocês. Só para lembrar, esse é um material que podemos encontra-lo descartado em grande quantidade, tornando-o mais interessante ainda para o projeto. Então, mãos a obra?


List of materials: drill and drilling bits, scissors, cutter, hand saw, wrench, glue, tape, mask and goggles, spray paint, sandpaper, newspapers, 1 bar with thread, 2 screws, 6 closed-end-cap nut, 6 washers, 1 meter long hose and 22 discs.
Lista de materiais: furadeira e broca, tesoura, estilete, serra manual, chave fixa, cola, fita adesiva, máscara e óculos, tinta spray, lixas, jornais, 1 barra com rosca, 2 parafusos, 6 porcas calotas e 6 arruelas, 1 metro de mangueira e 22 discos.

We start with templates. The first will be used to drill the 21 discs which will be the "body" of the CD stand. Dividing the disk into 4 equal parts with two lines, drill 3 holes as shown in the picture.
Iniciamos com os gabaritos. O primeiro gabarito servirá para furar os 21 discos que comporão o corpo do porta CDs.  Dividindo o disco em 4 partes iguais com dois traços, faça 3 furos conforme o exemplo ao lado.

The template is to create the support of the stand. Divide a disc in half. Take one half and place on top of the previous template, aligning the base, then mark the holes as shown in the picture.
O segundo gabarito dará origem aos pés do porta CDs. Divida o disco ao meio. Pegue uma metade e a posicione em cima do gabarito anterior, alinhando as bases e marque as furações, assim como o exemplo.


With the templates ready, just cut them and paste them on CDs to use as a templates to drill the CDs
Com os gabaritos devidamente desenhados e marcados, basta recorta-los e cola-los em discos, para servirem de gabaritos físicos para a furação das peças.

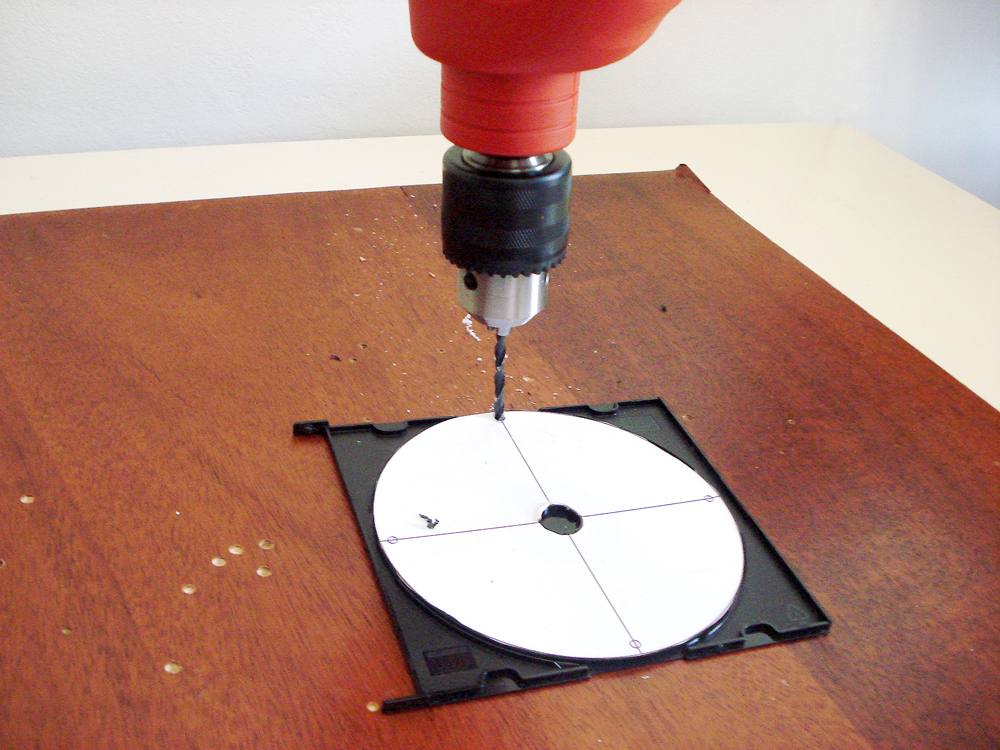
Now we will drill the holes on the CDs. Place the disc to drilled into the cradle and place above it the disc-template created on the previous step. You may use some adhesive tape between them to keep them in place.
Agora furaremos os discos. Coloque o disco a ser furado encaixado no berço e por cima o disco/gabarito. Fixe-os com uma etiqueta adesiva entre eles.


Then, we takethe CD which has the different holes set (from the second template) and saw it in half. When finished, sand the piece, removing burrs and smoothing the edges.
Em seguida, peguemos o CD com as furações diferentes para serra-lo ao meio. Ao finalizar, lixe a peça, retirando as rebarbas e dando acabamento.

When the previous steps are done,, clean the discs with a cloth moistened with alcohol. With a sandpaper we sand the inner side (the "laser reading side") so that it became slightly rough, therefore allowing the ink to be applied.
Finalizada as etapas anteriores, limpe os discos com um pano umedecido com álcool. Com uma lixa, gastemos o lado de leitura do laser, para que fiquem levemente ásperos para a tinta conseguir se fixar.

Now, in a well ventilated place, we cover the floor with newspaper and place the cds side by side so that they can be painted easily. Use spray paint to achieve uniformity.
Organizamos um espaço arejado, forrando o chão com jornais, dispondo todos os discos lada a lado para que possam ser pintados com facilidade. Utilize tinta spray para conseguir uniformidade no acabamento.


Note: To paint them with spray paint,, the can has to be between 40 and 45cm distant from the discs, so that just a thin, "dust-looking", layer covers the discs. Wait about two hours to paint them again and repeat the procedure untill they are fully covered. It takes around 5 times to complete. We have to do it this way because the glazed area of the disks does not allow the ink to fix easily. 
Obs.: Para pinta-los com a tinta spray, deveremos jogar a tinta numa distância entre 40 a 45 cm dos discos, pulverizando a tinta de forma despretensiosa, deixando que uma leve poeira os cubra, nessa primeira de mão. Espere em torno de 2 horas para a segunda de mão e repita o procedimento. Para que os discos fiquem bem acabados, serão necessárias quatro a cinco de mãos. Esse método é feito dessa forma, pois a área acetinada dos discos não permite que a tinta se fixe facilmente. Você poderá utilizar uma seladora plástica como base para tinta, mas o trabalho com a seladora será praticamente o mesmo, porém gastará mais tempo e dinheiro.


Take the bar and mark it with 25cm long as shown in the picture. Cut the bar with a handsaw and repeat the procedure so that you get two small bars.
Pegue a barra de rosca e marque a medida 25 cm, assim como mostra a imagem. Corte a barra com uma serra manual e repita a operação para que você obtenha duas pequenas barras. 


Take up the transparent hose and mark at every 1 cm, cut with scissors. We will need 40 pieces of this.
Pegue agora a mangueira transparente e faça marcas de 1 cm de distância entre elas, e as corte com uma tesoura. Precisaremos de 40 peças iguais.

Take a disc and a "support-disc" and attach them using the rod, screws, washers and closed- end-cap nuts. When this is done, place a piece of the hose on each bar and then attach another disc, just as shown in the picture.
Pegue um disco e um pé e os una com as barras com rosca, parafuso, arruelas e porcas calota. Feito isso, coloque um pedaço de mangueira em cada barra e na sequência outro disco, assim como na imagem ao lado.


Repeat this step until you close the other end of the object with the last disc and the second "support-disc".
Repita essa sequencia até fechar a outra extremidade da peça, fechando-a com o ultimo disco e o segundo pé.


Ready! We just assembled the newest CD stand to make your collection way more fun and to bring some order and irreverence to your record collection. We hope you enjoyed it and that you will try to assemble your own!
Pronto! Acabamos de montar o mais novo porta CDs para divertir sua decoração e trazer um pouco de ordem e irreverência para a sua coleção de discos. Esperamos que tenha gostado e que tente executá-lo de verdade!


It is worth noting that this project can be done whit the size and shape you may preffer, and you can finish it as you want (different colours, etc.)it just depends on on your creativity and willingness to produce it. Feel free to experiment, innovate and break rules. That's what makes our life more fun and "tasty"!
Vale a pena ressaltar, que este projeto pode ser feito no tamanho e formato que desejar, assim como possuir o acabamento que mais o atrair, dependendo apenas de sua criatividade e disponibilidade de produzi-lo. Fique a vontade para experimentar, quebrar regras e inovar. Isso é que faz nossa vida ser mais rica e saborosa! 


See you soon!
Até breve!

Project by/Projeto por: Marcelo Barros

Mar 1, 2012

multipurpose lamp/luminária multiuso de CD/DVD

Hello, VOQers!
Olá, VOQers!

As promised, in this post we will learn how to make a simple and minimalist lamp using, again, discarded CDs / DVDs. As mentioned in the previous post, this is a very interesting material to be used and we can find it discarded in large quantities.
Assim como combinamos, neste post aprenderemos a fazer uma luminária simples, minimalista, utilizando novamente os CDs/DVDs descartados. Como comentamos no post anterior, esse é um material bem interessante para ser utilizado e que podemos encontra-lo descartado em grande quantidade.

In this project, I chose to use the internal area of ​​the disc (the reading area) and the disc's simple shape as a esthetic concept for the object; using only seven discs. We know that their colour may vary from silver to gold or even green and blue; therefore, the use of this variation can be interesting. Let's see how it goes ...
Neste projeto, escolhi utilizar a área interna do disco (área de leitura do laser) como conceito estético para a peça, assim como sua forma simples utilizando apenas 7 discos. Sabemos que estes variam em algumas possibilidades de cores, tais como o prata, o dourado, verde e azul, então, utilizar-se dessa variação pode-se obter combinações interessantes. Vamos ver no que vai dar...

List of materials: drilling machine with small wood drill bits, scissors, cutter, screwdrivers, hand saw, mettalic files, glue, masking tape, 7 discs, small nylon clamps, templates and electric parts (wire, switch, plug, socket and lamp).
Lista de materiais: furadeira com broca pequena para madeira, tesoura, estilete, chaves de fenda e philips, serra manual, jogo de limas metálicas, cola, fita adesiva, 7 discos, pequenas abraçadeiras de nylon, gabarito e sistema elétrico para luminária (fio, interruptor, plug, soquete e lâmpada).


We start with the drilling template. Each disc have to have 4 holes; so we draw a 12cm circle and divide it into 4 equal parts (90degrees). At the end of each line, mark the drilling points at 0.3cm from the edge. Cut out the template and place on a disc.
Iniciamos com o gabarito. Cada disco levará 4 furos, então devemos dividir a circunferência de 12 cm de diâmetro em 4 partes iguais com dois traços. Nas pontas de cada traço, marcamos os pontos de furação, dando 0,3 cm de distância da borda. Recortamos esse gabarito, o colamos num disco e    fazemos as furações.


Then, drill the holes on 6 discs. Use the acrylic box of CDs to assist in drilling. Place the disc with the paper template on top of others, placing an adhesive between them to make them steady.
Em seguida furaremos os 6 discos. Utilize a caixinha acrílica de CDs para auxiliá-lo na furação. Coloque o disco a ser furado primeiramente, e por cima a peça com gabarito. colocando uma etiqueta adesiva entre eles, para fixa-los.
We´ll make also an opening for changing bulbs. To make it, beside the four standar holw, cut out a circumference of 11 cm in diameter on only one of the discs.
Faremos também uma abertura para a troca de lâmpadas. Para isso, além dos 4 furos padrões, recortamos uma circunferência de 11 cm de diâmetro, em um dos discos. 
Now, with all discs drilled, grab one of the pieces and assemble the electric part. Here I fixed the socket and the output of the eletric wire with the help of two washers.
Agora com todos os discos furados, pegamos uma das peças e montamos o kit elétrico. Aqui montei o soquete e a saída do fio de energia, travados no  disco com ajuda de uma trava branca e duas arruelas.
Next, we assemble two parts using nylon clamps by putting them between the holes we drilled. Do not tighten the clamps; just close them in a way to make structure balanced.
Na sequencia, fixamos uma peça na outra utilizando as abraçadeiras de nylon, passando-as entre as furações que fizemos. Não apertem as abraçadeiras, apenas as fixem suficientemente para que a estrutura se mantenha com certo equilíbrio.
After assembling all the parts, adjust fasten the clamps to its limits and then cut out the burrs.
Com toda a luminária montada, ajustamos as abraçadeiras apertando-as em seu limite e depois recortamos suas rebarbas.


The last disk will serve as a cover for the opening, so that it maintains the same look on all sides. To do it, cut the disc on the pre-drilled hole with a hand saw. To give some finishing, use mettalic files.
O disco faltante servirá de tampa para a abertura da luminária, para que ela mantenha o mesmo aspecto em todas as suas faces. Para isso, abriremos os furos cortando-os com uma serra manual. Para dar acabamento utilize limas metálicas redondas ou canoas.


Once all the cuts are ready, place the disk on the lamp's opening. To lock it we use the tips of the clamps, turning them into the top of the last disc, as shown in the picture.
Assim que todas as aberturas estiverem prontas, encaixaremos o disco na abertura da luminária. Para trava-lo utilizaremos as pontas das abraçadeiras, girando-as para dentro do disco aplicado, assim como ilustrado na imagem ao lado.


To finish, assemble the other parts of the electrical system and then test. And the assembly of our multi-purpose lamp is completed!
Por fim, montamos as demais peças do sistema elétrico e o testamos em seguida. E aqui concluímos a montagem da luminária multiuso!


With just few pieces we can build a beautiful multipurpose luminaire. I call it "multipurpose" because you can use it in very different ways, one of them is the one you can see on the picture above, as a kind of wall sconce. However, it can be placed on tables, hang from the ceiling, resting on the floor, stack them ... it's you who sets the tone of the game. Enjoy!
Apenas com poucas peças conseguimos montar uma bela luminária multiuso. A chamo de multiuso, pois é possível utiliza-la de diversas formas, uma delas é a que você pode ver neste post. Ela aqui está como uma espécie de arandela, ou luminária de parede, mas pode ser colocada em mesas, penduradas no teto, descansando no chão, empilha-las... você é quem dá o tom da brincadeira. Divirta-se!


See you soon!
Até breve!


Project by/Projeto por: Marcelo Barros