Páginas

Mar 18, 2011

Wireframe ceiling lamp – luminaria de teto com moldura de arame


Hello!
Oi!

I’m back to show you a new project, today it is a project aimed more on inspiring creativity than to be reproduced. The idea here, as you will see, is to show that you can take any wireframe and transform it into ceiling lamps.
De volta com mais um novo projeto, o de hoje é mais um exemplo para inspiração do que para ser reproduzido. A ideia aqui é mostrar que você pode pegar qualquer tipo de moldura aramada e transformá-la em uma luminária.


For this project I used: a reel (it was used by welding robots, and this empty reel is discarded by many industries, but as I said above, you can use any kind of wireframe), a cotton string (again, you can use any kind of string), electrical parts (as shown in many previous projects), pliers and scissors.

Para esse projeto eu usei: um carretel (é um carretel de solda robótica, muitas indústrias descartam esse carretel vazio, mas você pode usar qualquer outro tipo de moldura), barbante (mas você pode usar o fio que preferir), partes elétricas (como mostrado em diversos projetos anteriores), alicates e tesoura


First I fixed the lamp socket on the upper part of the reel (I fixed it using the string)

Primeiro eu fixei o soquete na parte superior do caretel (fixei usando o barbante)


Then just complete the electrical part (install the wire)    

Então complete a parte elétrica (instale o fio)


And after that you can do the covering of the lamp with the string as you prefer; as I wanted a “nest” looking, I just tied one end to the frame and started to “weave” it.

Depois disso você pode fazer a “cobertura” da luminária com o fio do jeito que você quiser; como eu quis um visual “ninho” eu amarrei uma ponta no carretel e comecei a “tecê-lo”


Here I put a piece of vegetal paper inside to create a more diffuse light.


Aqui eu coloquei um pedaço de papel vegetal para criar uma iluminação mais difusa


When the cover is done, you can make some finishing, as I did here on the wire, with the string and glue.

Quando a cobertura estiver pronta, você pode dar acabamentos, como eu fiz no fio com barbante e cola.


That is it! Simple, isn't it?
É isso! Simples, não?


One more thing, due to lack of space at home, I’m selling the products shown here, so if you are interested, just send an email to viraroque@gmail.com
Mais uma coisa: devido à falta de espaço em casa (rs) eu estou vendendo os produtos que confeccionei para o blog, portanto, se vocÊ tiver interesse em algum, mande um email para viraroque@gmail.com

And if you have your project, send it so that I can show it here! Let’s interact!
E se você tiver seu projeto, mande para que possamos colocar aqui! Vamos interagir!

Hope you liked it.
Thanks!
Espero que tenha gostado!
Obrigado!

Project by/ projeto por Nicholas B. Torretta

Feb 24, 2011

Table with rackets - mesa de raquetes


Hello!
Olá!

Today’s example, also done by me, is a little bit more complicated then the others that I’ve posted here; but nothing impossible. I found these rackets some days ago and decided to build a table, I liked the result, and so, here it is:
O exemplo de hoje, também feito por mim, é um pouco mais trabalhoso que os que eu já postei aqui, mas nada impossível. Encontrei essas raquetes esses dias e resolvi fazer uma mesinha, gostei do resultado, então aqui vai:

You need: two wooden rackets, wooden “sticks”, a hand-saw, a hammer, a drilling machine, a ruler, cutter, a wood file, nails, white glue and superbonder glue.

Você precisa de duas raquetes de madeira, “barrinhas” de madeira, uma serra, martelo, furadeira, régua, lápis, estilete, limas, além de pregos, cola branca e superbonder.


As this product is a little bit complicated, I separated the step in two parts: top and base, to make easier to understand. Let’s go:
Como esse produto é um pouco mais complexo, separei em duas partes: tampo e base, para facilitar. Vamos lá:

Top Tampo:


First, mark on the racket where will cut it, remember that, as longer you leave the piece of cable, higher will be the table.

Primeiro marque no cabo da raquete onde você vai cortá-la, lembre que quanto mais o pedaço restante de cabo, maios a altura da mesa. Por isso eu deixei o máximo possível de cabo.


After that you can put a tape if you want, to align the places where you are going to saw.

Depois de marcar, você pode colocar uma fita como na imagem para marcar melhor e alinhar o corte.


Now, just saw it.

Agora é só cortar na parte indicada.


Now put the pieces as they are going to be assembled and mark the part where they touch each other.

Posicione as peças como elas serão montadas e marque a parte onde elas irão encostar.


Sand that area so that the glue fixes better.

Lixe a parte onde será a junção para que a cola fixe melhor.


Put white glue between the pieces and then superbonder around it to hold the pieces in place while the white glue dries.

Coloque cola branca entre as peças e depois superbonder por fora só para fixar enquanto a cola branca seca.


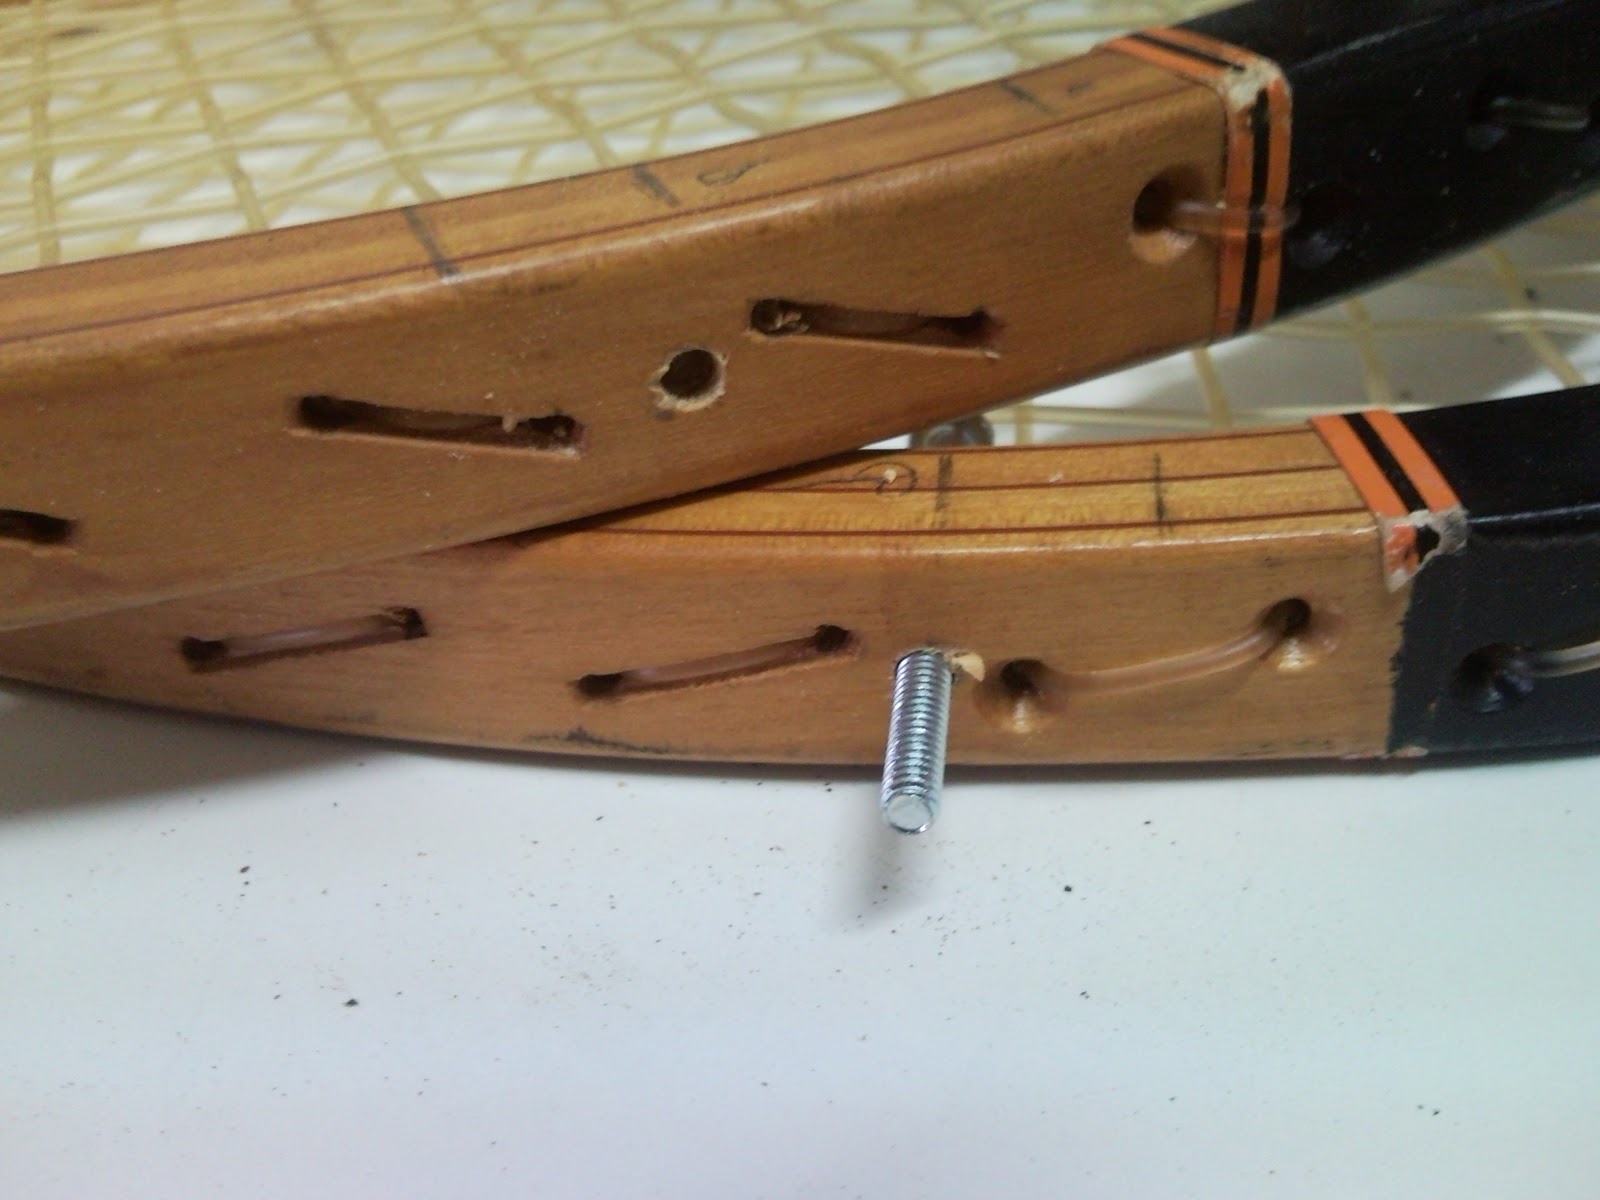
Now, with a drill (which must be thinner than the nail that you have) make some holes on the joints

Agora, com uma broca (que deve ser um pouco mais estreita que o prego que você possuir) faça um furo em cada junção.


Now, carefully, hammer a nail into the hole.

Agora, cuidadosamente martele um prego no buraco para prender bem as partes.


Now set the two assembled rackets in a laytou that you prefer (here I decided to pu then as shown on the picture) and then, mark with a pencil the point where you are going to join them together.

Posicione as duas raquetes já “dobradas” conforme você vai querer que elas fiquem ao final, eu aqui escolhe como mostra a foto. Então marque com um lápis um ponto no meio onde você unirá as duas.


Make one hole on each one and join them; here I used a screw and a nut to join.
Faça um furo em cada uma e una; aqui eu usei um parafuso com porca, mas se você preferir de outro modo fica a seu critério.


The base - a base:

Set the piece that you assembled on a piece of paper and draw the shape that you want for the base. I chose a rectangle base due to the material that I had (the wooden “sticks”), but you can do the shape you prefer, according to the material that you have.

Posicione a montagem em cima de uma folha de papel para desenhar a base que você vai querer. No caso eu escolhi fazê-la quadrada por causa do material que eu possuía. 


After drawing it, transfer the measures to the material.

Após desenhar, passe as medidas para o material no qual você vai fazer a base. Aqui no caso as “barras” de madeira.


Cut the pieces, here, as it is a rectangle, I had to make this cuts with a 45º angle.

Corte as peças, aqui, como é um retângulo, tive que fazer cortes de 45º para encaixar as peças.


Now put the pieces together with white glue and superbonder; you can also put a tape to hold while the glue dries.

Junte as partes com cola branca e superbonder, você pode colocar uma fita também para segurar enquanto a cola seca.


Now fix the parts, which won’t be fixed on the racket’s cable, with a nail (make a hole whit the drilling machine, than hammer the nail.

Prenda as partes que ficarão soltas (não fixadas no cabo da raquete) com um prego (faça um furo com uma broca pequena e depois passe o prego).


Now, with the top turned upside down, put the base in the position you want.

Agora, com o tampo de cabeça para baixo, coloque a base na posição.


Drill some holes to join them (one hole in each piece of wood).

Fure locais para fixação (um por pedaço de madeira).


And then, put the nails.

E coloque pregos.


Ok! The table is assembled! But, I’m used to say to you that you can do some finishing on the products that I show here, in a way to obtain a better aesthetic; but I never to it to show. This time I decided to do it; I made a finishing with resin and paint. Here is how it looks:

Pronto, a mesa está montada. Agora, eu sempre falo que pode ser dado acabamento nos produtos que coloco aqui, no fim de obter um visual menos parecido com sucata, porém nunca faço isso para exemplificar. Desta vez resolvi fazê-lo, fiz um acabamento com resina e tinta para ficar mais harmonioso, vejam o resultado:


Hope you enjoyed!
Espero que tenham gostado!

Just to remember: If you have any doubt or something to ask about any project that I show here, just leave your comment or send me an email viraroque@gmail.com
And if you have some project that you made, send me with pictures and the “step by step” that I post it here!

Lembrando que se você tiver alguma dúvida ou questão a respeito de qualquer projeto, é só deixar no comentário ou enviar um email para viraroque@gmail.com
Se você tiver um projeto que você fez, me mande com fotos e a explicação do passo a passo que eu o colocarei aqui!

Thanks!
Obrigado!

Project by/Projeto por Nicholas B. Torretta


Feb 5, 2011

Cupboard from a basket – Armário com cesta


Hello! After a long time without posting new things here I’m back with a new example of reuse. Today’s example is a cupboard made with a basket. It is very simple and results in a very sympathetic aesthetic.

Oi! Após um longo tempo sem postar, estou de volta com mais um exemplo de reutilização. O exemplo de hoje é um armáriozinho feito a partir de uma cesta. É bem simples e resulta numa aparência bem simpática.


What you need is: a basket, hard cardboard paper (better if it is horlle), ruler, drilling machine, screw driver, rubber feet, felt protection and screws.

O que você precisa é: uma cesta, papelão duro (melhor se for do tipo horlle), régua, furadeira, chave de fenda, pés de borracha, feltro adesivo (vende pronto) e parafusos.


First step: look at the basket’s structure to see where you can put the shelves.

Primeiro, olhe a estrutura da caixa para ver onde poderá apoiar as prateleiras.


After that, measure de inner space where you will put them.

Em seguida, meça o espaço interno onde caberão as mesmas.


Now cut the cardboard according to the size you measured before. If you want, you can use wooden plate instead of cardboard. Here I used horlle and covered it with Craft paper.

Corte o papelão no tamanho indicado. Se você quiser, pode usar chapas de madeira ao invés de papelão; neste caso eu usei horlle e encapei com papel craft.


Then make one hole on the center of each rubber feet as shown in the image.


Depois disso, fure os pés de borracha como indicado


Through the inner part of the rubber feet, insert one screw in each one.

Pela parte de dentro do pé, coloque um parafuso em cada


Now make hole on the basket (structure) where you want to place the feet.

Fure a cesta (na estrutura) nos locais onde você que colocar os pés.


Now screw the feet into the place then glue the felt on it.


Parafuse os pés nos locais e cole o feltro em cima


Put the shelves, and it is ready!

Coloque as prateleiras e pronto!


Here is the result: A sympathetic little cupboard, very easy to build.

Eis aqui o resultado. Um armariozinho simpático, com um visual de “litoral”, muito simples de fazer.


Hope you enjoyed!
Espero que tenham gostado!

Thanks!
Obrigado!

Project by/Projeto por:  Nicholas B. Torretta 


Jan 22, 2011

Pausa temporária - temporary pause

Hello, I want to apologize for the big time without putting things here. Unfortunately I had some unexpected problems (no, I'm not on vacations, but I wish I was... lol) and I'm going to be able to continue with the posts in February 2011. See you soon! Thanks!


Oi! Eu quero pedir desculpas pelo grande tempo sem postar algo novo aqui. Infelizmente eu tive uns problemas inesperados (não, não estou de férias), que me deixarão voltar com os posts aqui só em Fevereiro. Até breve! Obrigado!

Dec 25, 2010

Minimalist lamp - abajur minimalista


Olá!
Antes deste post, que será o ultimo deste ano, quero avisar sobre algumas mudanças no blog :)
Bom, como devem ter notado, este mês fiz uma postagem a cada quinze dias, pois ando muito ocupado, então, o ano que vem continuará assim, teremos uma postagem a cada duas semanas. Porém, se você me enviar seus projetos, poderemos ter mais postagens! Colabore!
Além disso, como disse acima, este é o ultimo post deste ano, pois tirarei umas férias e retornarei com novos projetos no dia 14 de Janeiro de 2011!

Hello!
Before today's post, which will be this year's last one, I want to tell you about some changes that will happen on the blog. =)

Well, as you might have seen, this month I made one post every two weeks (I have been very busy) so, next year, I will have to post every two weeks also. But, if you send me your projects, we can have more posts!
 And another thing is, as I said before, this will be this year's last post. I will have vacations and will return on January 14th.

Bom, vamos ao produto de hoje:
Também desenvolvido por mim, este é um abajur "minimalista", não foi feito com a intenção de ser minimalista, mas sim pensando em utilizar somente o mínimo necessário. Um conceito que gosto bastante e acho primordial dentro do rol do ecodesign e sustentabilidade.

Ok, let's go to today's project:
Also developed by me, this is a "minimalist" lamp; It wasn't though with the intention to be "minimalist", but it was projected to aim the concept of "the less possible", what I mean is, to use only the necessary amount of materials. This is a concept that I like and which I think it is very important concerning sustainability and ecodesign.


Bom, vamos lá, é bem simples:
Você precisa de: arame, material elétrico (soquete, interruptor, plug, fio e lâmpada), alicates e parafusos (ou algo para fazer uma base)

So, all you need is: Wire, electric material (lamp socket, plug, switch, flex and a lamp), pliers and screws.


Primeiro começamos montando toda a parte elétrica, se você não souber como se monta uma, no google é fácil encontrar tutoriais, é bem simples. Se quiserem, posso colocar um passo a passo qualquer dia aqui (é só pedir).

The first step is to assemble the electric part, if you don't know how to assemble it you can easily find tutorials on google. But if you want, I can publish a "step-by-step" here, so, just ask me if you need!


Após isto, molde o arame como preferir (no caso eu enrolei dois arames para dar mais força).

After that, just give some shape to the wire (I decided to twist to parts together to give more strength to the object).


Depois por último, a base. Como eu tenho um painel furado no meu quarto, eu decido prende-lo com parafusos, mas você pode fazer como mandar sua necessidade/criatividade (pode prender a uma madeira, pregar na parede com parafusos, etc.).

Then, the base; as I have a panel with holes on my wall; I decided to attach the lamp there, so I added the screws to the wire and placed it on the panel. But you can do whatever you want to create a base (you can attach is to some wood, or puts it on a wall with screws, and so on... the limit is your creativity, therefore, there is no limit!)


É isso!
Desejo um feliz natal e ótimo ano novo a todos os que comemoram!
Boas férias, até dia 14!

That's it!
I wish, for those who celebrate, a happy Christmas and a wonderful new year!
See you on January 14th

Obrigado!
Thanks!

Projeto por Nicholas B. Torretta
Project by Nicholas B. Torretta